Plain-language guides for setting up and running PointDrop. No technical knowledge needed.
/
Browse all topics
Getting started
What PointDrop does
Customers earn points when they shop and swap them for discount codes.
PointDrop is a loyalty program for your store. Customers collect points every time they buy something. When they have enough, they swap the points for a discount on a future order. That gives them a reason to come back.
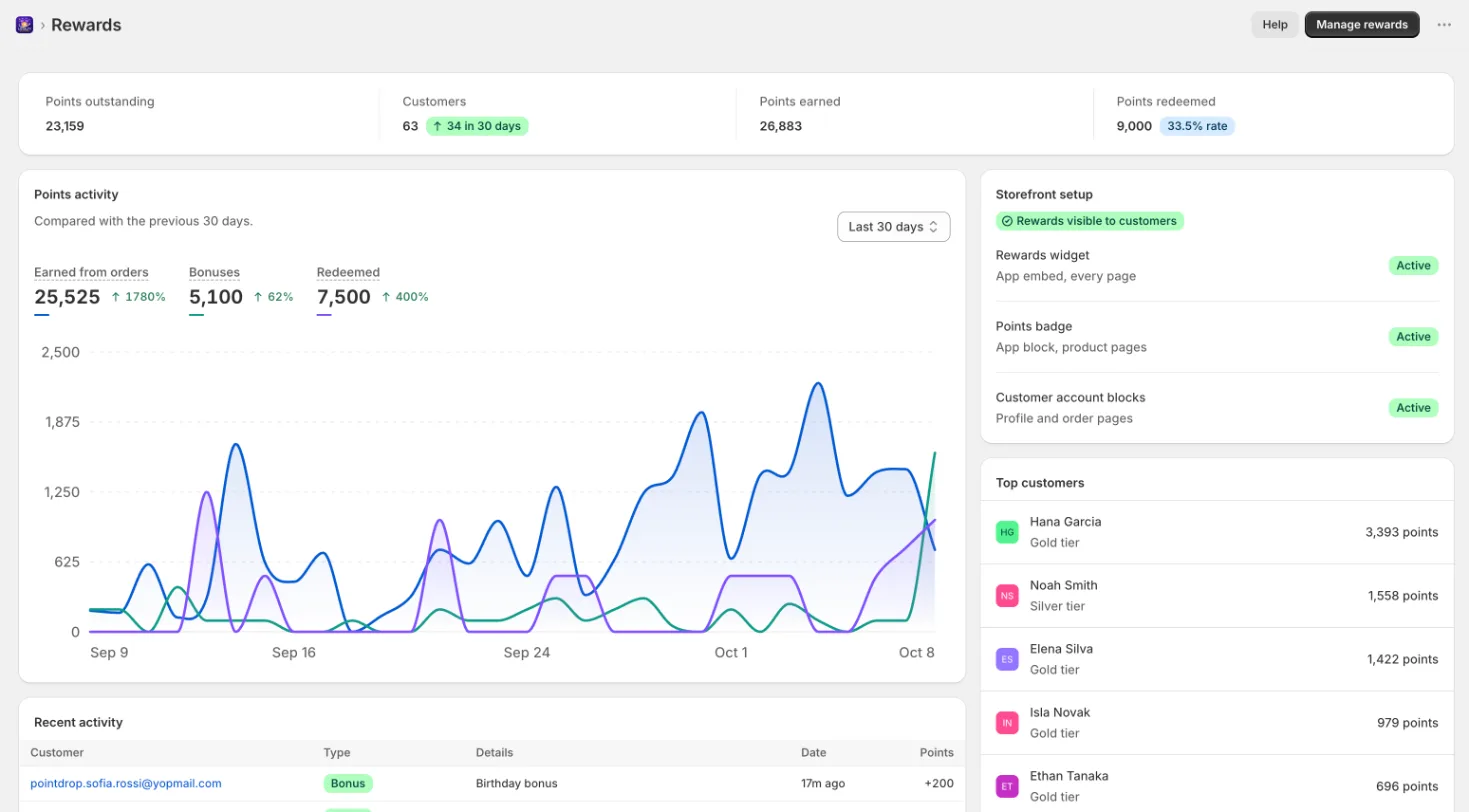
The PointDrop dashboard: program totals, points activity over time, storefront setup and your top customers.
Earning is automatic. Points are added as soon as an order is paid. You don't have to do anything.
Rewards are real discount codes. When a customer redeems, PointDrop creates a one-time Shopify discount code just for them.
You're in control. You decide how many points people earn and what the rewards are, and you can change them any time.
Tip
Refunds and cancellations are handled for you. If an order is refunded, the points earned on it are taken back automatically.
Quick start: live in 10 minutes
The five things to do after installing, in order.
Do these five things and your loyalty program is live.
Install PointDrop from the Shopify App Store and approve the permissions. You'll find it in your Shopify admin under Apps → PointDrop.
Choose your earning rate in Settings → General, for example 1 point for every $1. How to set up your program
Switch on the Rewards button for your store from the Storefront setup card on the PointDrop Home page. How to show rewards on your store
Create at least one reward in Rewards, such as “100 points = $5 off”. How to create rewards
Place a test order on your store, then check the points appear under Customers.
Good to know
The first time you open PointDrop, a short setup screen walks you through the same steps. You can click Skip setup and come back later.
Set up your program
Set up your program
Name your program, choose the earning rate and the redemption rules.
Open PointDrop → Settings (the General tab), change what you need, then click Save in the bar at the top of the page.
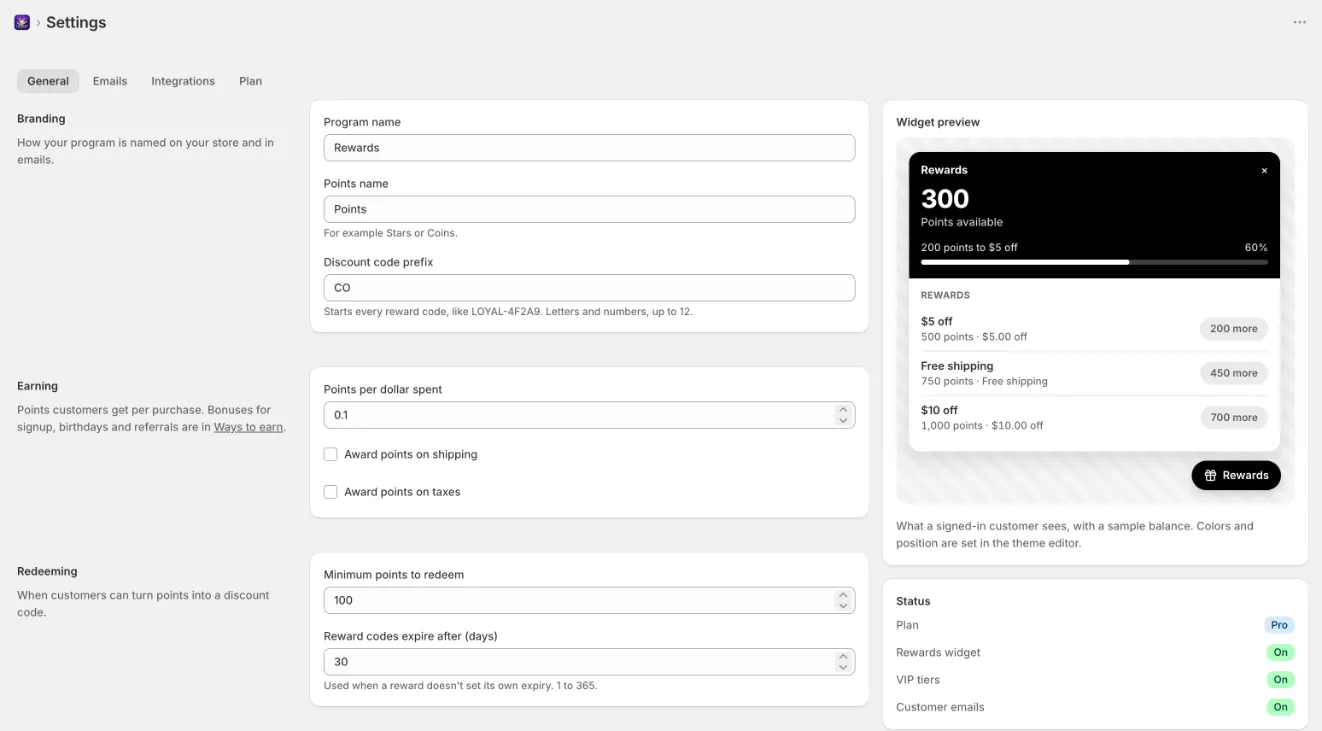
Settings → General: name your program, set the earning rate and redemption rules. The widget preview shows what customers see.
Program name
The name customers see, like “VIP Club” or “Rewards”.
Points name
What you call your points: “Points”, “Coins”, “Stars”…
Discount code prefix
The start of every reward code, so you can spot them in Shopify (e.g. LOYAL-).
Points per dollar spent
Points earned for each $1 spent. 1 is a good start.
Award points on shipping / taxes
Also give points on shipping and tax. Most stores leave these off.
Minimum points to redeem
The fewest points a customer needs before claiming any reward.
Reward codes expire after (days)
How long a reward code works after it's claimed (1–365 days).
Show the rewards widget on my store
Shows the Rewards button on your store. Keep this on.
The Widget preview on the right shows what a signed-in customer sees in the Rewards button with your program name, points name and cheapest rewards.
Tip
Not sure what to pick? Start with 1 point per $1 and a reward of 100 points = $5 off. That gives customers 5% back, and you can change it any time. Points already earned are never affected.
Show rewards on your store
Switch on the Rewards button in your theme so customers can see it.
The Rewards button sits in the corner of your store. Customers click it to see their points and claim rewards. You switch it on once in your theme.
Open PointDrop → Home. In the Storefront setup card, click Add next to Rewards widget. (If the widget isn't on yet, the yellow message at the top has a Turn on rewards widget button that does the same.)
The theme editor opens with Loyalty widget already switched on, and the Rewards button shows in the preview.
Optional: change the button text or colours, or move it to the bottom-left.
Click Save in the top-right corner. Done.
Good to know
Prefer to do it by hand? In Shopify go to Online Store → Themes → Customize, click the App embeds icon on the left, switch on Loyalty widget, and click Save.
Optional: “Earn X points” on product pages
Show shoppers how many points a product is worth, right under the price.
In the theme editor, choose Products → Default product from the menu at the top.
Click Add block, open Apps, and pick Earn points badge.
Drag it under the price and click Save.
Tip
You only need one of these: the Rewards button, the product badge or the customer account blocks. Use any one or a combination. After someone visits, the PointDrop Home page shows Rewards visible to customers. That's how you know it's working.
Create rewards
Decide what customers can spend their points on.
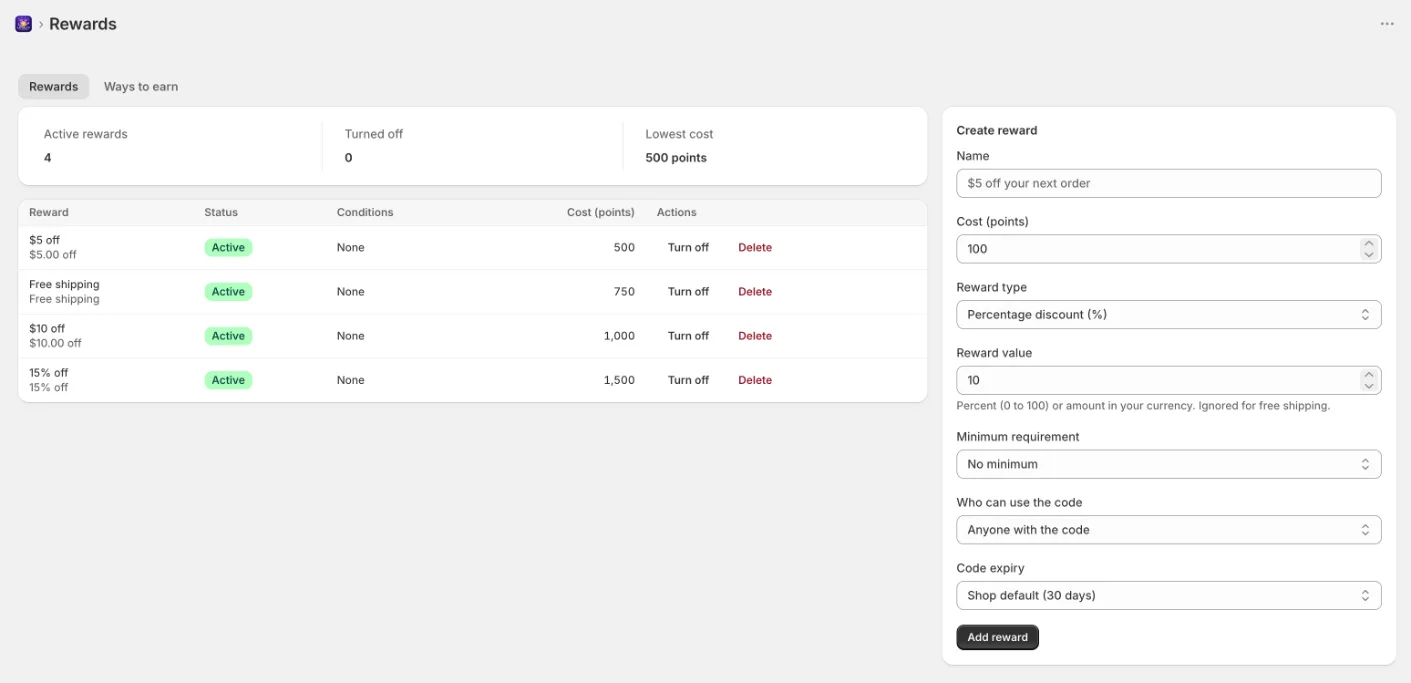
Rewards are what customers spend their points on. Go to PointDrop → Rewards and fill in Create reward:
Rewards: your reward list on the left, the Create reward form on the right.
Name
What customers see, e.g. “$5 off your order”.
Cost (points)
How many points the reward takes.
Reward type
A percentage off, a fixed amount off, or free shipping.
Reward value
For example 10 for 10% off, or 5 for $5 off.
Applies to
Percentage and fixed amount rewards only. The entire order, or only the products you pick with Browse products (up to 50). Customers see which products the reward covers.
Minimum requirement
Optional. A minimum order amount or item count before the code works.
Who can use the code
Anyone with the code, or only the customer who redeemed it.
Code expiry
Use the shop default from Settings, or set your own number of days.
When a customer claims a reward, PointDrop creates a real Shopify discount code just for them. They enter it at checkout like any other code.
Use Turn off to hide a reward without losing it, or Delete to remove it. Codes already given out keep working.
Tip
Offer 2–3 rewards at different levels, for example 100 points for $5 off, 250 points for $15 off, and 500 points for $25 off. A small first reward gets people coming back sooner.
Extra ways to earn points
Bonus points for signing up, birthdays, referrals and more.
Customers always earn points on purchases. In PointDrop → Rewards → Ways to earn you can also give bonus points for:
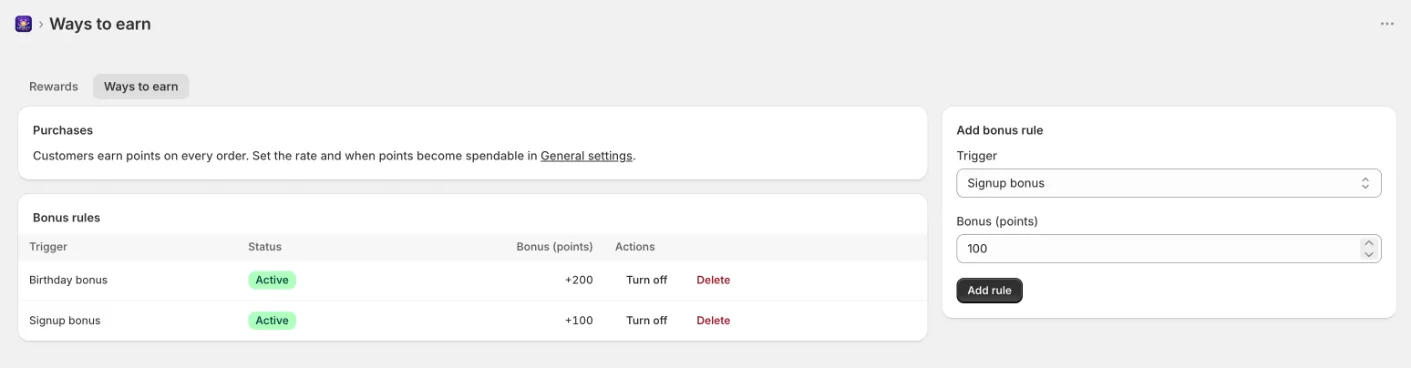
Rewards → Ways to earn: bonus points for signups, birthdays and referrals.
Signing up for a customer account.
Their birthday, once a year (Growth plan and above).
Referring a friend who then places their first order (Starter plan and above).
Following you on social media or leaving a product review.
In Add bonus rule, pick the Trigger, enter the bonus, and click Add rule. Anything marked “plan required” needs a higher plan. The rate for purchases lives in Settings → General.
Show points in customer accounts
Let logged-in customers see their balance on their account pages.
PointDrop can also show points on your customers' account pages, so they can check their balance any time after logging in.
In Shopify go to Settings → Checkout (or Customer accounts) and click Customize.
Open the Profile page and add the Loyalty balance block. You can add it to the Order status page too.
Add the Loyalty rewards page to give customers a full rewards page in their account menu.
Click Save.
Good to know
This needs Shopify's new customer accounts. If your store uses classic accounts, the Rewards button on your store does the same job.
Run your program
Manage customers & points
Look up balances, adjust points by hand and see every transaction.
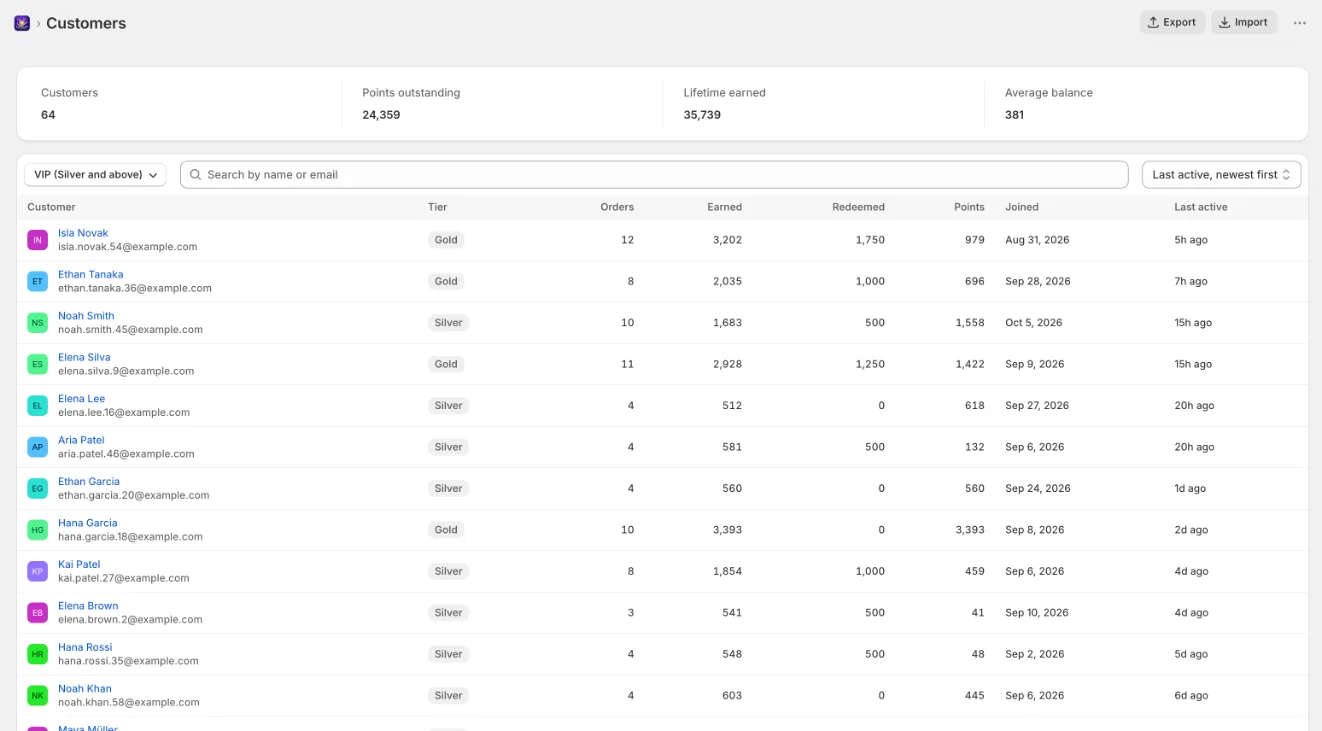
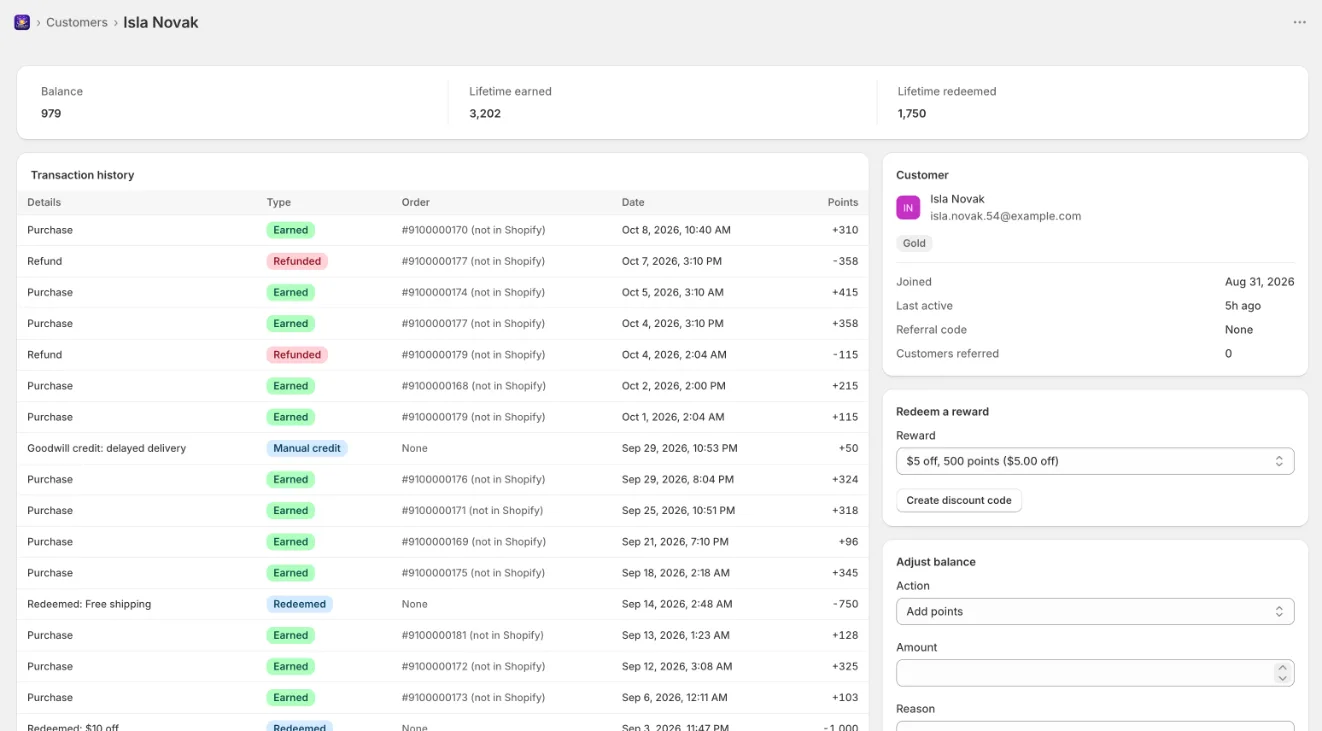
PointDrop → Customers lists everyone in your program and their points. Use the view menu next to the search box (All) to narrow the list: customers who can redeem a reward, active or inactive customers, new members, or VIPs. Click a name to see their full history. From there you can:
Customers: pick a view like VIP or Can redeem, search by name or email, and click a name to open their history.
Adjust balance: add or remove points by hand, for example as a thank-you. Add a short reason; it shows in their history.
Redeem a reward on their behalf, for example when they ask by email or phone.
A customer's page: their full history on the left, redeem and adjust on the right.
Transactions
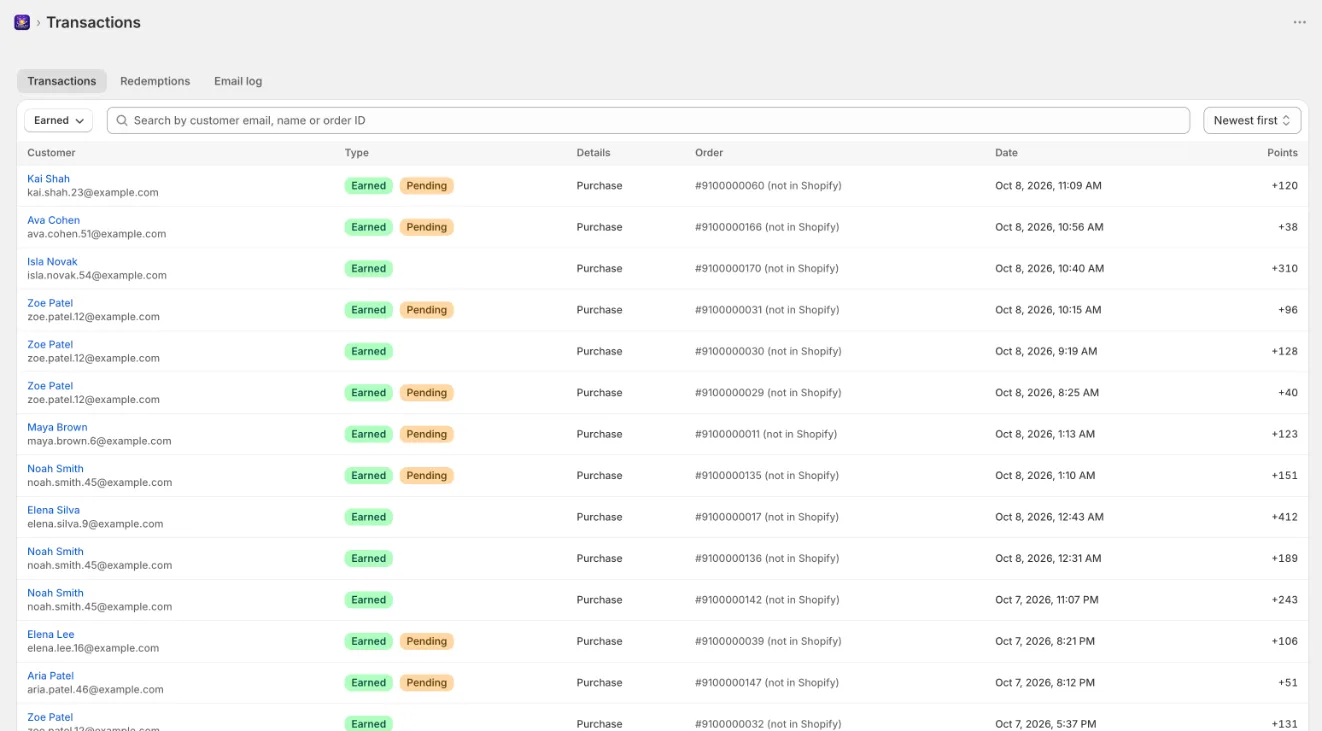
PointDrop → Activity → Transactions shows every point earned, spent, refunded or adjusted, for all customers. Search by customer email, name or order ID, and pick a view (Earned, Redeemed, Bonuses, Adjustments, Refunds or Imported) to see one kind at a time.
Activity → Transactions with the Earned view selected.
Redemptions
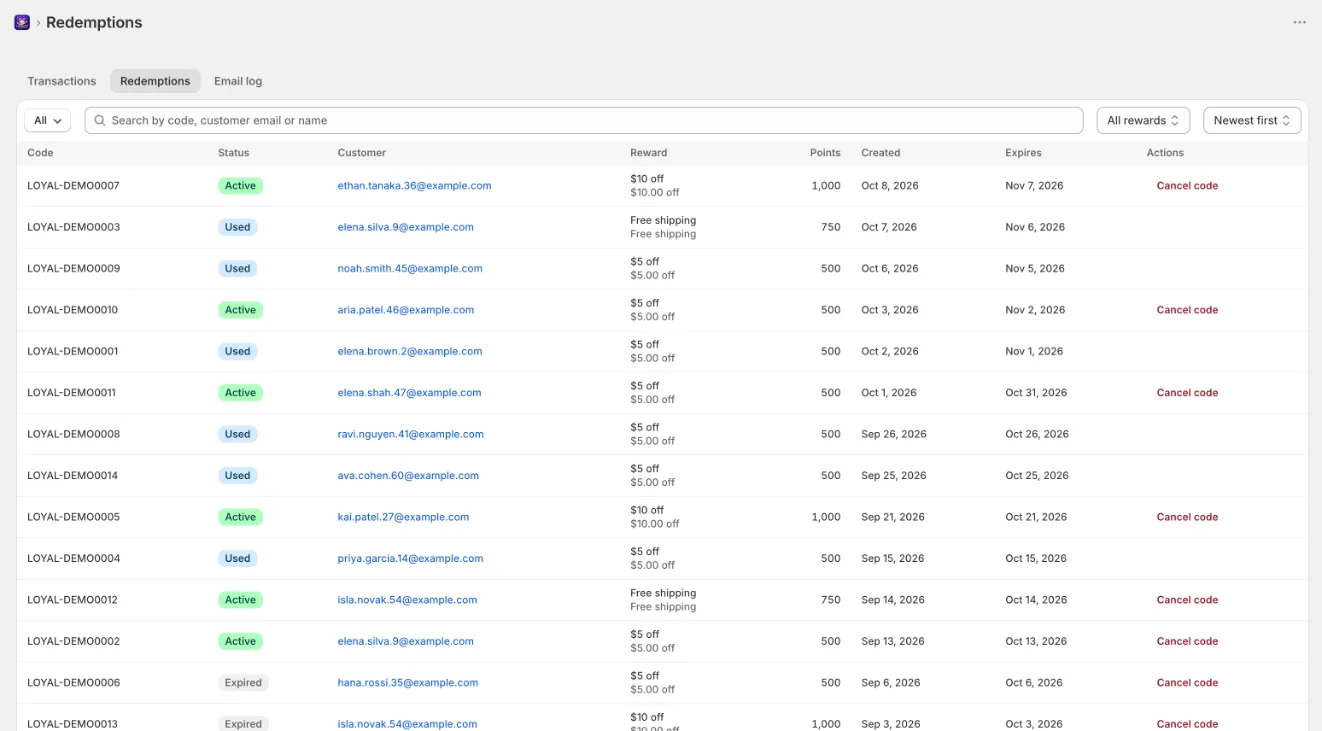
PointDrop → Activity → Redemptions lists every reward code that's been claimed and when it expires. Pick a view (Unused, Used, Expired or Cancelled), search by code or customer, filter by reward, and click Cancel code to switch a code off and give the points back.
Activity → Redemptions: every reward code, its status and when it expires.
Tip
On the Starter plan and above, click Export on the Customers page to download your customer list as a spreadsheet (CSV).
Move members and their points from Smile.io, LoyaltyLion, Yotpo or a spreadsheet.
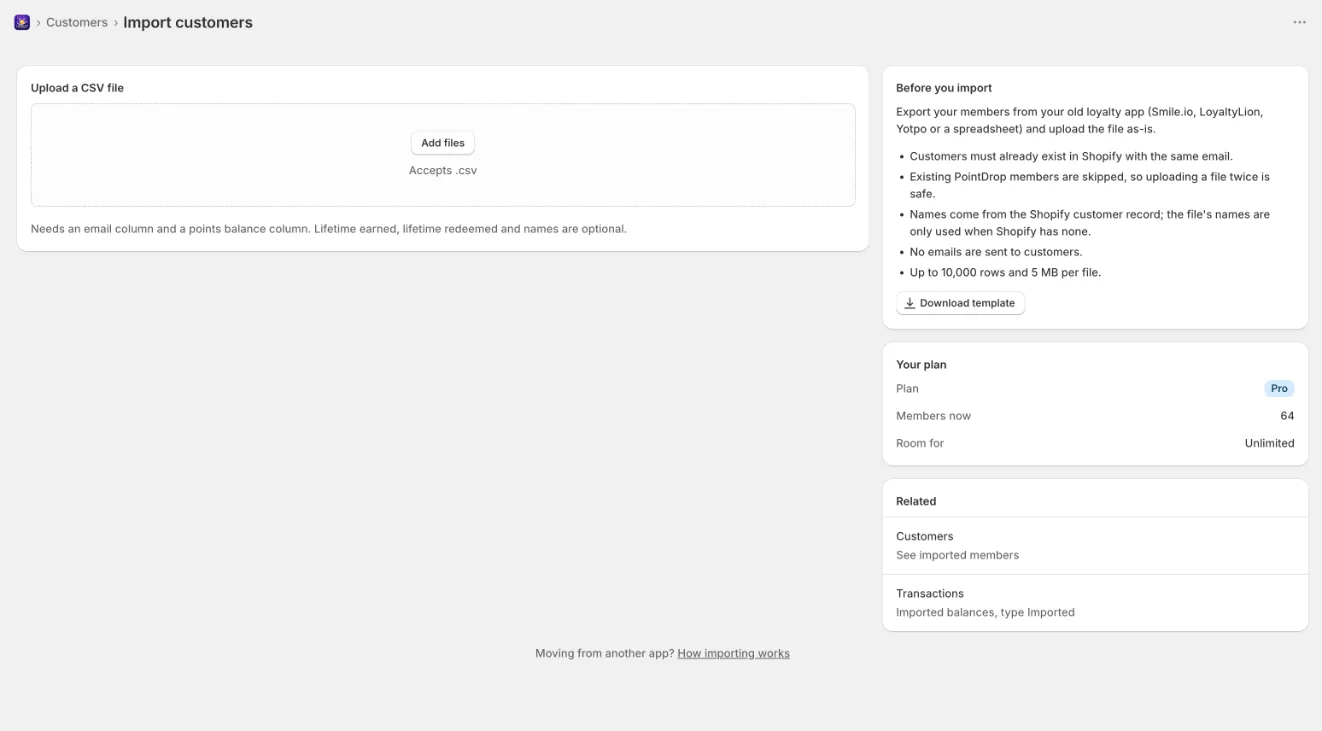
Switching loyalty apps? Upload one CSV file and your members arrive in PointDrop with their points balance. Available on the Growth and Pro plans.
Export your members from your old app (most apps have an Export customers or Export points button). You don't need to edit the file.
Open PointDrop → Customers and click Import at the top of the page.
Drop the file onto the upload box. PointDrop shows which columns it found, how many rows are ready and any rows with problems, before anything is saved.
Click Import and keep the page open until it finishes. Large files take a minute or two.
Check the results. Download the skipped rows, fix them and upload that file again if needed.
Customers → Import: upload your file, and check the rules and your plan's room on the right.
What the file needs
Email (required)
The customer's email in Shopify. Headers like Email or Email address work.
Points balance (required)
Current points. Headers like Points, Points balance or Balance work. Whole numbers; 1,200 is fine.
Lifetime earned / redeemed (optional)
Totals shown on the customer page. Headers like Points earned and Points spent work.
First name / Last name (optional)
Only used when the Shopify customer has no name. Names on the Shopify customer record always win.
Up to 10,000 rows and 5 MB per file. Not sure about the format? Click Download template on the import page.
Good to know
Customers must already exist in Shopify with the same email. PointDrop never creates Shopify customers; rows without a match are skipped.
Customers who are already PointDrop members are skipped, so uploading the same file twice never doubles points.
No emails are sent to customers during an import.
Imported points show as Imported in Activity → Transactions and follow your normal points expiry from the import date.
Your plan's customer limit still applies (Growth: 5,000 customers). Rows past the limit are skipped.
Tip
Import before you switch your old app off, then turn on the PointDrop Rewards button. Customers see the same balance the next time they visit.
Customer emails
Automatic emails when customers join, earn points, or claim a reward.
PointDrop can email customers at these moments. Emails are on the Starter plan and above.
Welcome
When a customer joins and gets the signup bonus
Points earned
When an order earns points
Reward code
When a customer redeems points for a code
Birthday
On a customer's birthday, with the birthday bonus (Growth and above)
Points expiring
Two weeks before a customer's points expire (only when you set points to expire)
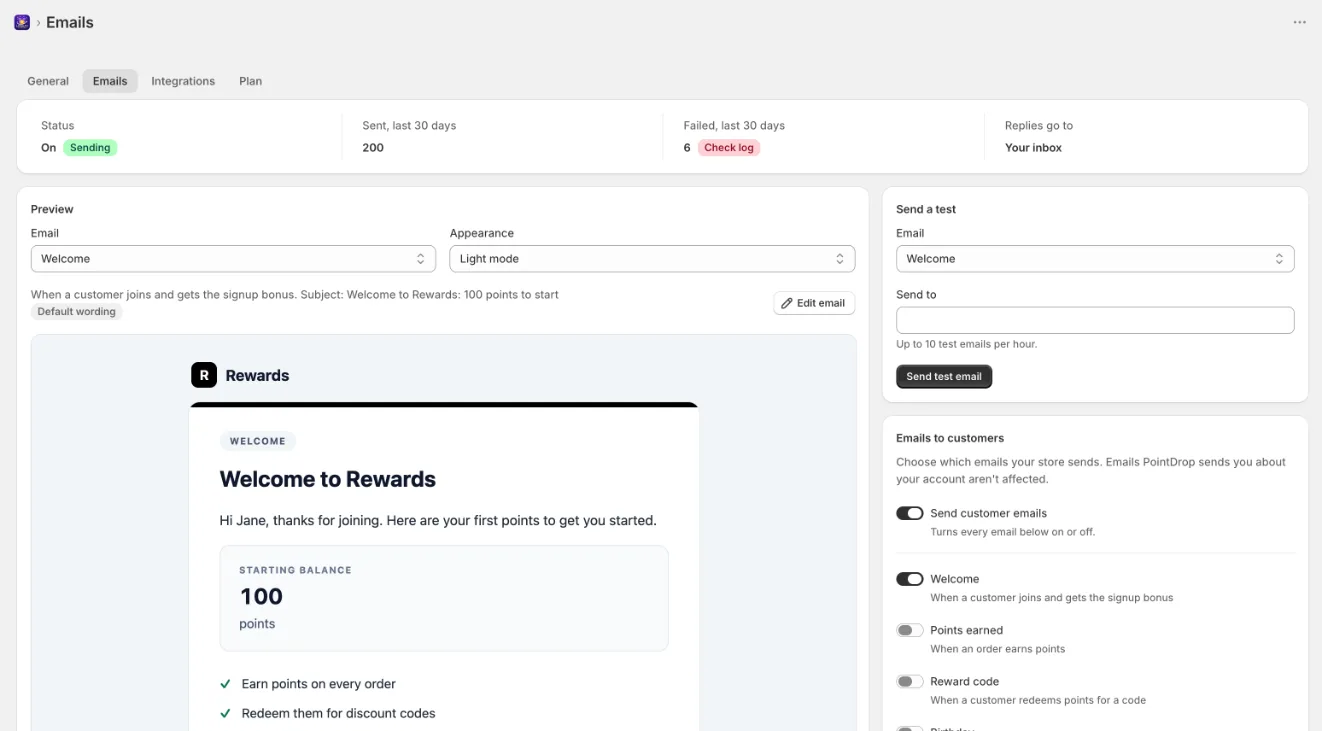
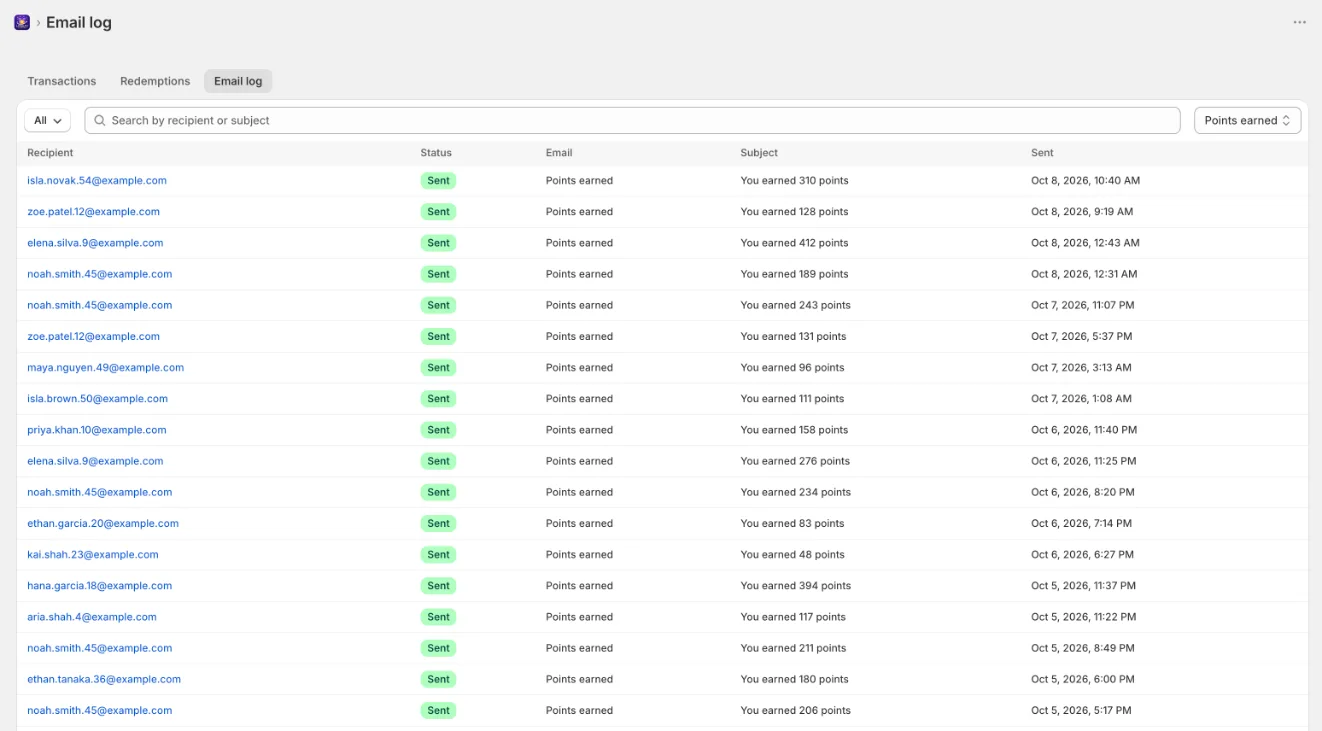
Open Settings → Emails to preview each email and send yourself a test, or switch any email off. To see what was sent, open Activity → Email log. Search by recipient, pick a view (Sent, Failed or Not sent), filter by email, and spot failed sends. Entries are kept for 90 days.
Settings → Emails: preview each email, send a test, and switch emails on or off.Activity → Email log, filtered to Points earned emails.
To change the wording, pick an email there and click Edit email. You can rewrite the subject line, heading, message and button text, and use placeholders like {first_name} or {points} that fill in for each customer. Leave a field empty to use the default, or click Restore default to undo all your edits. Editing is on paid plans.
Switch each email on or off on the same Settings → Emails page. Set the reply-to address in Settings → Integrations.
Tip
For marketing emails like newsletters or win-back campaigns, use Klaviyo or Mailchimp. On the Pro plan, PointDrop syncs each customer's points to them.
VIP tiers
Give your best customers more points on every order.
VIP tiers reward your most loyal customers with extra points on every order. Customers move up automatically based on the total points they've ever earned. Available on the Growth plan and above.
Bronze0Everyone starts hereNormal points
Silver500lifetime points+10% points
Gold2,000lifetime points+25% points
Platinum10,000lifetime points+50% points
Turn this on in Settings → General → VIP tiers (tick Turn on VIP tiers). The numbers above are the defaults, and you can change them there. Spending points never moves a customer down a tier.
What your customers see
The earn-and-redeem journey from your shopper's side.
They shop and pay as usual. Points are added once the order is paid.
They click the Rewards button on your store to see their points, their tier, and the rewards they can afford. Shoppers who aren't logged in are asked to sign in first.
They click Redeem on a reward and get a discount code straight away.
They enter the code at checkout. Each code works once and expires after the number of days you chose.
Plans & billing
Plans & pricing
What each plan includes and how billing works.
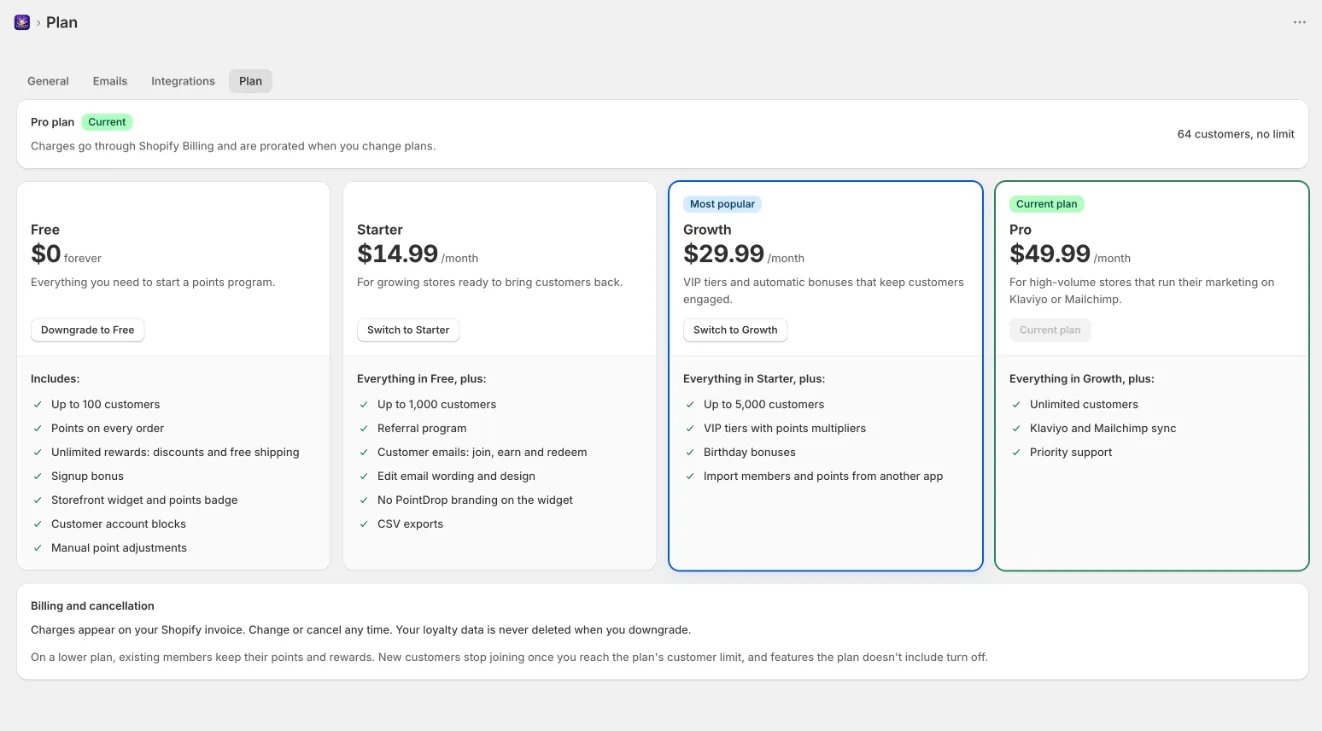
Change plans any time in PointDrop → Settings → Plan. Charges appear on your normal Shopify bill.
Free$0Up to 100 customers
Points on every order
Rewards & discount codes
Rewards button on your store
Starter$14.99 / monthUp to 1,000 customers
Everything in Free
Referrals
Customer emails you can edit
Customer CSV export
No “Powered by PointDrop” label
Growth$29.99 / monthUp to 5,000 customers
Everything in Starter
VIP tiers
Birthday bonus
Import from another app
Pro$49.99 / monthUnlimited customers
Everything in Growth
Klaviyo and Mailchimp sync
Settings → Plan: your current plan and a button to switch.
Good to know
If you move to a smaller plan, features it doesn't include switch off, but your customers keep every point they've earned.
Questions & troubleshooting
The Home page says “Not visible to customers yet”
PointDrop hasn't been seen on your store in the last 7 days. Add at least one of the Rewards button, the product badge or the customer account blocks: follow Show rewards on your store or Show points in customer accounts. Edit the theme marked Live, not a draft copy, click Save, visit your store once, then refresh PointDrop.
A customer didn't get points for an order
Points are added when an order is paid. If it's still pending, they arrive once payment goes through. Orders placed before you installed PointDrop don't earn points. You can always add points by hand from the customer's page.
What happens when I refund an order?
PointDrop takes back the points earned on the refunded amount automatically. A partial refund takes back a matching share.
Where do I find the reward discount codes?
In PointDrop → Activity → Redemptions, and in Shopify under Discounts (they start with your code prefix). Please don't edit them in Shopify. Cancel them from PointDrop instead.
The Rewards button asks customers to sign in
That's expected. Points belong to a customer account, so shoppers log in to see them. Make sure customer accounts are turned on in Shopify under Settings → Customer accounts.
Can I change my points rate later?
Yes. New orders use the new rate straight away. Points customers have already earned stay exactly as they are.
What happens if I uninstall PointDrop?
The Rewards button disappears and customers can no longer earn or redeem points. Discount codes already given out keep working until they expire.
Can I bring my members over from Smile.io or LoyaltyLion?
Yes, on the Growth and Pro plans. Export your members from your old app and upload the file in Customers → Import. Their points balances come with them. How importing works
Still stuck? We're happy to help.
Email us at support@tekgen.io. Include your store address (the .myshopify.com one) and what you were trying to do, and we'll get back to you.
 PointDrop